Showing posts with label devops. Show all posts

Creating a Beautiful , Stable Website using Docker and Azure App services

My Weather Station Project Journey

Documenting the journey of building a robust data logging and visualization solution.

You might remember my previous project where I built a miniature weather station. In that setup, I displayed live sensor readings using an MQTT broker app on Android. (If you missed it, you can check out the details here: Solar Weather Station with MQTT and the MQTT client I used: MQTT Client on Google Play).
Weather station setup 1 Weather station setup 2

While this initial approach worked for live data, I quickly ran into a couple of significant limitations:

  • Constant Internet Dependency: The system required a continuous internet connection to view the readings.
  • No Historical Data: Crucially, the MQTT setup didn't store any past data, making trend analysis impossible.

To overcome these challenges, I needed a more robust solution: a web application with a dedicated data logger.


What's a Data Logger and Why Did I Need One?

Data logger concept

In my previous setup, sensor data was published to an MQTT broker and displayed instantaneously. However, this data wasn't being saved anywhere. To address this, I needed to:

  1. Capture the Data: Subscribe to the MQTT topics.
  2. Store the Data: Save these readings into a persistent database.

For this, I developed a Python script that subscribes to the relevant MQTT topics and logs the incoming sensor data into an SQLite database. Each entry is timestamped with the current UTC time, ensuring that the logged data is traceable and clear for analysis.


Building the Web Application: Tech Stack and Features

With the data logging mechanism in place, I built a web interface using:

  • Backend: Flask (a Python web framework)
  • Frontend: Basic HTML, CSS, and JavaScript

This web application provides several key features:

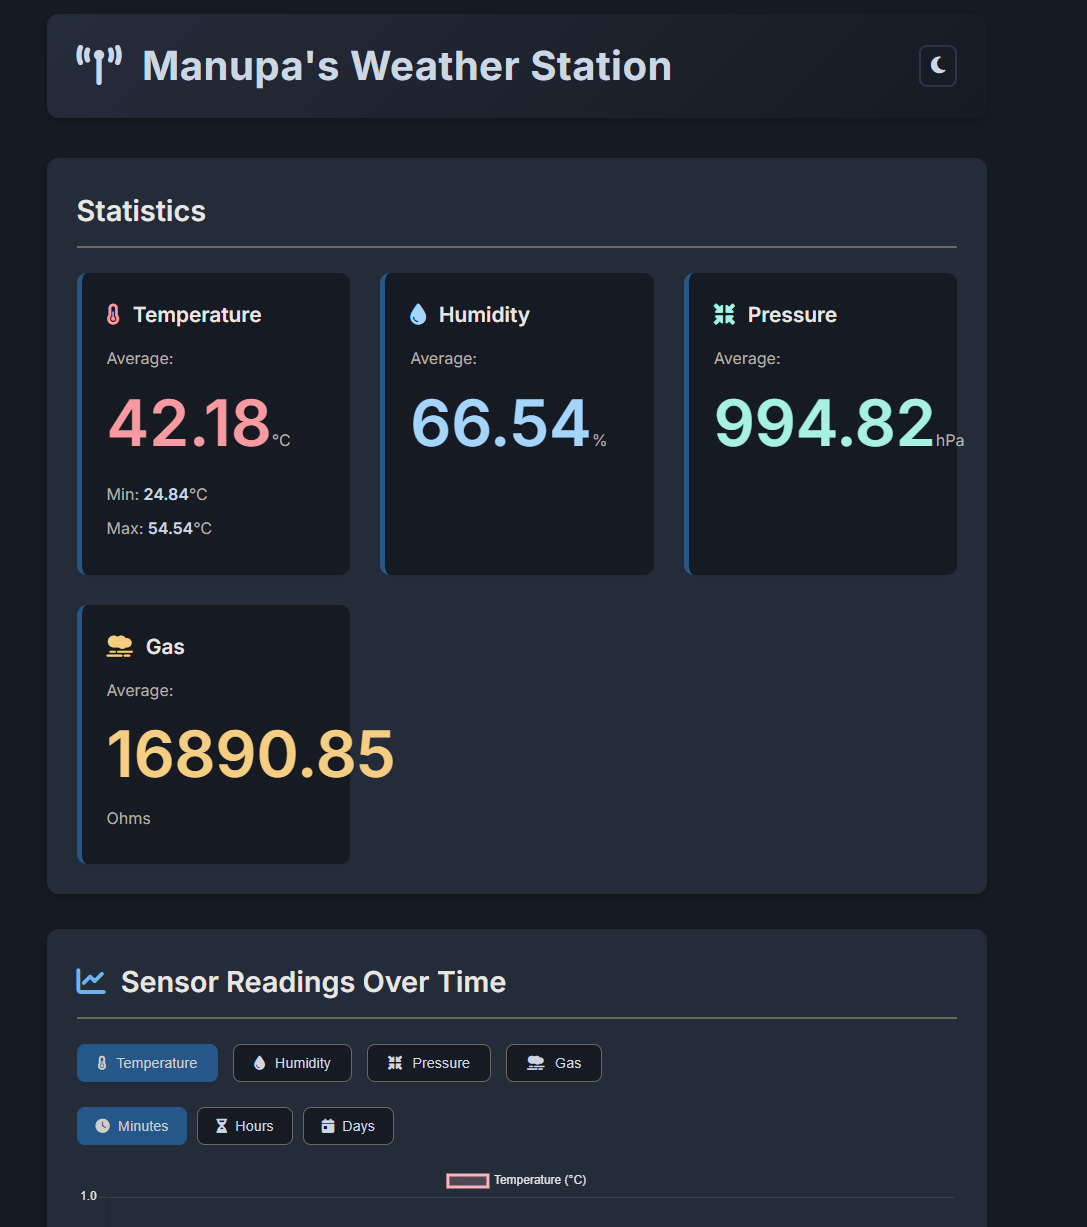
  • Average Sensor Readings: Displays summarized information for various sensors.
  • Historical Data Visualization: Allows users to view past data, classified by minutes, hours, and days.
  • Data Export: The entire database can be downloaded as a CSV file for offline analysis or use by customers.
Web application interface

Navigating Deployment Challenges: From VMs to App Services

I tried deploying the system in a VM in Azure, but I faced several issues:

Azure VM issues diagram Security concerns diagram
  • Lack of HTTPS out-of-the-box: Securing the application required manual SSL certificate configuration.
  • No Friendly URL: Access was via a public IP address, which isn't user-friendly.
  • Security Concerns: Managing security on a VM can be complex.
  • Manual Management: Updates and maintenance were time-consuming.
  • Performance Issues: Lower-tier (SKU) VMs often froze under load.

After discussing these issues with friends, (Thank you Tharindu 😉) the clear recommendation was to containerize the application using Docker and deploy it as an Azure App Service. This approach offered a much smoother path.
Docker and Azure App Service

Azure App Services provides various ways to run web applications, including options for static web apps, web apps with databases, and WordPress sites. Given my need for a dynamic application with features like persistent storage and a separate, continuously running data logger, I opted for the Web App service.

Azure App Service options

To streamline deployment, I packaged the entire project, including the Flask application and the Python data logger, into a Docker image. This image was then pushed to GitLab's Container Registry and made public, allowing Azure App Services to easily pull and deploy it.

Container source selection in Azure Azure App Service configuration

You can select your container from different sources when setting up the App Service.

App Service creation

Finally, the system is running!

System running successfully

The Result: A Secure and Scalable Web App ✨

Dashboard Link

I'm thrilled to say the system is now running smoothly! The final website is accessible, secure, and much easier to manage.

This project was a fantastic learning experience. I now have a secure (HTTPS-enabled) application with minimal maintenance overhead, thanks to Azure App Services. It also benefits from inbuilt scaling capabilities and protection mechanisms like Azure Front Door (if configured).

Final application view

Future Enhancements 🛠️

While the current version is a significant step up, there are a couple of features I plan to add next:

  • User Authentication: Implement a sign-in page to manage access for different users.
  • Integrated Database Solution: Migrate data storage from the SQLite database within the Docker container (which can be difficult to access for direct downloads) to Azure's inbuilt database services. This will make data management and backups more robust and accessible.

© 2025 Manupa Wickramasinghe. All rights reserved.

Proudly built with Tailwind CSS Gemini and a passion for IoT.

Breathing New Life: Building a Home Server from Old Laptop

Breathing New Life: Building a Home Server from Old Laptops

Breathing New Life: My DIY Home Server Project! 💻➡️🏠

Turning e-waste into a useful home lab with a bit of tinkering.

The Spark ✨: Old Laptops Get a Second Chance

Recently, a friend gifted me some old laptops. Instead of letting them gather dust or become e-waste, I saw an opportunity! 💡 Why not build a home server? It's a great way to learn, host services, and make use of hardware that might otherwise be discarded.

Old Laptop Case Another Old Laptop Case

The challenge? These laptops came barebones – no SSD, no RAM, and crucially, no power adapter! But where there's a will (and some spare parts), there's a way.

The Hardware Hustle 🛠️: Powering Up!

The biggest hurdle was power. Luckily, I had a nifty USB-C PD Fast Charger Decoy Board (100W capable!) lying around. These little boards can negotiate specific voltages from USB-C Power Delivery chargers.

USB C PD Decoy Board

The laptop needed 19V via its barrel jack. I configured the decoy board's DIP switches to request 20V from my USB-C charger (close enough!). Then came the slightly nerve-wracking part: soldering! 👨‍🏭

  • Identified the positive (+) and ground (-) pins on the laptop's power input.
  • Soldered the decoy board's output wires directly to these points.
  • Carefully cut a small slot in the laptop's casing to neatly house the board.
  • Used strong double-sided tape to secure the board inside.
Soldering the PD board Laptop drawing power via USB C

Plugged in the USB-C charger, held my breath... and success! 🎉 The laptop powered on, drawing juice through the new setup. Phew!

Next, I installed some spare DDR3 RAM and an old SATA SSD I had available. Hardware complete! ✅

The Software Stack 🐧🐳: Ubuntu & Docker

With the hardware sorted, it was time for the operating system. I opted for Ubuntu Server – it's stable, widely supported, and great for server tasks. Installation was straightforward via a USB drive.

Installing Ubuntu Server

To manage the various services I wanted to run, I decided to use Docker. Containers make it super easy to install, run, and manage applications in isolated environments. No more dependency nightmares! 🐳

Installing Docker on Ubuntu:

# Update package list
sudo apt update

# Install prerequisites
sudo apt install -y apt-transport-https ca-certificates curl software-properties-common

# Add Docker's official GPG key
curl -fsSL https://download.docker.com/linux/ubuntu/gpg | sudo gpg --dearmor -o /usr/share/keyrings/docker-archive-keyring.gpg

# Add Docker repository
echo "deb [arch=$(dpkg --print-architecture) signed-by=/usr/share/keyrings/docker-archive-keyring.gpg] https://download.docker.com/linux/ubuntu $(lsb_release -cs) stable" | sudo tee /etc/apt/sources.list.d/docker.list > /dev/null

# Install Docker Engine
sudo apt update
sudo apt install -y docker-ce docker-ce-cli containerd.io

# Add your user to the docker group (to run docker without sudo - log out/in after)
sudo usermod -aG docker ${USER}

# Verify installation
docker --version

Note: You'll need to log out and log back in for the group change (`usermod`) to take effect.

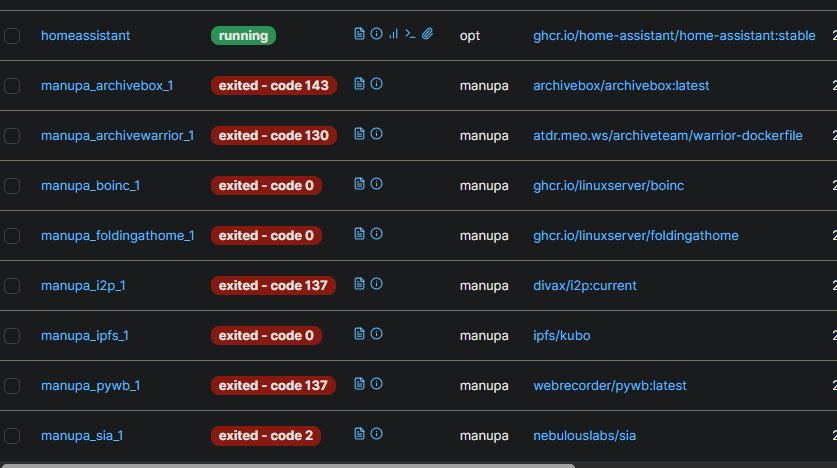
My Container Crew 🚀: Services Running

Here are the initial containers I set up:

🗄️ ArchiveBox (Good Karma Kit)

ArchiveBox Interface

This awesome tool creates local, browsable archives of websites. Perfect for saving articles, documentation, or anything important online before it disappears. The Good Karma Kit aspect seems focused on archiving public interest content.

Docker Run Command:

docker run -d \
  --name archivebox \
  -p 8000:8000 \
  -v ~/archivebox_data:/data \
  archivebox/archivebox

Access it at `http://[your-server-ip]:8000`. Replace `~/archivebox_data` with your desired host path for data storage.

🚢 Portainer

Crontab example

Managing Docker containers via the command line is fine, but Portainer provides a fantastic web UI. It makes it easy to view logs, manage containers, networks, volumes, and more. Highly recommended for managing your Docker environment!

Docker Run Command (Portainer CE):

# First, create a volume for Portainer data
docker volume create portainer_data

# Then, run the Portainer container
docker run -d \
  -p 8000:8000 \
  -p 9443:9443 \
  --name portainer \
  --restart=always \
  -v /var/run/docker.sock:/var/run/docker.sock \
  -v portainer_data:/data \
  portainer/portainer-ce:latest

Access it at `https://[your-server-ip]:9443` (HTTPS) or `http://[your-server-ip]:8000`. You'll set up an admin user on first access.

🎬 Plex Media Server

Portainer Dashboard

No home server is complete without a media solution! Plex organizes your movies, TV shows, music, and photos, allowing you to stream them to virtually any device, anywhere. It scans your media folders and automatically fetches metadata and artwork.

Docker Run Command (Requires Plex Claim Token):

# Get a claim token from https://www.plex.tv/claim/
# Replace YOUR_CLAIM_TOKEN, /path/to/plex/config, /path/to/tvshows, /path/to/movies

docker run -d \
  --name plex \
  --network=host \
  -e PLEX_UID=$(id -u) \
  -e PLEX_GID=$(id -g) \
  -e PLEX_CLAIM="YOUR_CLAIM_TOKEN" \
  -e TZ="Your/Timezone" `# e.g., Asia/Colombo` \
  -v /path/to/plex/config:/config \
  -v /path/to/transcode/temp:/transcode \
  -v /path/to/media/tvshows:/data/tvshows \
  -v /path/to/media/movies:/data/movies \
  --restart unless-stopped \
  plexinc/pms-docker:latest

Access the setup wizard at `http://[your-server-ip]:32400/web`. Make sure the paths you map (`/path/to/...`) exist on your host system and have correct permissions.

🏠 Home Assistant

Plex Interface

Home Assistant! It's an incredibly powerful open-source home automation platform. You can integrate smart devices, create automations, track sensors, and build amazing dashboards.

Docker Run Command:

docker run -d \
  --name homeassistant \
  --privileged \
  --restart=unless-stopped \
  -e TZ=Your/Timezone `# e.g., Asia/Colombo` \
  -v /path/to/homeassistant/config:/config \
  --network=host \
  ghcr.io/home-assistant/home-assistant:stable

Access it at `http://[your-server-ip]:8123`. Replace `/path/to/homeassistant/config` with your desired config path. `--network=host` is often needed for device discovery.

📊 btop++ (Resource Monitor)

While not typically run as a Docker container, `btop++` is an excellent TUI (Text User Interface) resource monitor. It gives a detailed, real-time view of CPU, memory, disk, and network usage right in your terminal. Very handy for seeing how the server is performing!

Installation Command (Ubuntu):

sudo apt update
sudo apt install -y btop

Usage:

btop

Smart Scheduling ⏰: Working Around Data Caps

My ISP offers unlimited data during off-peak hours (midnight to 7 AM). To take advantage of this for potentially data-intensive tasks (like ArchiveBox fetching sites), I set up a cron job. Cron is a time-based job scheduler in Unix-like operating systems.

I scheduled tasks to automatically stop certain containers at 7 AM and start them again at midnight. This helps manage bandwidth usage and costs effectively. 💰

Example Cron Job (Edit with `crontab -e`):

# Stop ArchiveBox container at 7:00 AM daily
0 7 * * * docker stop archivebox

# Start ArchiveBox container at 00:00 AM (midnight) daily
0 0 * * * docker start archivebox

You'd add similar lines for any other containers you want to schedule.

What's Next? 🤔 More Containers!

This is just the beginning! I'm excited to explore more self-hosted applications. What other containers do you recommend for a home server setup?

Some popular ideas include:

  • Nextcloud ☁️: Your own private cloud for files, calendars, contacts, and more (like Google Drive/Dropbox).
  • Pi-hole 🚫: Network-wide ad blocker. Say goodbye to most ads on all your devices!
  • Vaultwarden (Bitwarden server) 🔑: Self-hosted password manager.
  • Jellyfin 🎞️: Another excellent open-source media server alternative to Plex.
  • AdGuard Home 🛡️: Similar to Pi-hole, provides network-wide ad and tracker blocking.
  • Uptime Kuma 📈: A fancy monitoring tool to check if your services (and other websites) are online.

Let me know your favorite self-hosted apps!

Project built with spare parts, caffeine, and open-source software. ☕

Running Deepseek R1 on my Laptop CPU (No GPU).

Running DeepSeek on a CPU with Ollama and Docker
AI Concept Image

Running DeepSeek on a CPU with Ollama and Docker

Note: Everything Written Here is from LLMs (OpenAI and Deepseek)

Introduction to DeepSeek

DeepSeek is a powerful AI tool designed for natural language processing and deep learning tasks, often relying on GPUs to accelerate computation. However, not everyone has access to high-performance GPUs, and DeepSeek's adaptability allows it to be deployed on CPU-only systems. In this blog post, I'll demonstrate how to run DeepSeek on a self-hosted server, specifically an 11th Gen Intel i5 laptop CPU. We'll leverage Ollama for model optimization and Docker for containerized deployment, ensuring an efficient and streamlined setup. Whether you're exploring AI for personal projects or lightweight applications, this guide will help you make the most of your hardware resources.

Installing Docker on Linux, macOS, and Windows

Docker is a powerful tool for containerization, making it easy to run and deploy applications in isolated environments. Here's how to install Docker on the three major operating systems.


1. Installing Docker on Linux

For Ubuntu, Debian, and similar distributions:

Step 1: Update your system
sudo apt update
sudo apt upgrade -y
Step 2: Install required dependencies
sudo apt install -y ca-certificates curl gnupg
Step 3: Add Docker’s official GPG key and repository
sudo install -m 0755 -d /etc/apt/keyrings
curl -fsSL https://download.docker.com/linux/ubuntu/gpg | sudo gpg --dearmor -o /etc/apt/keyrings/docker.gpg
echo "deb [arch=$(dpkg --print-architecture) signed-by=/etc/apt/keyrings/docker.gpg] https://download.docker.com/linux/ubuntu $(lsb_release -cs) stable" | sudo tee /etc/apt/sources.list.d/docker.list > /dev/null
Step 4: Install Docker
sudo apt update
sudo apt install -y docker-ce docker-ce-cli containerd.io docker-buildx-plugin docker-compose-plugin
Step 5: Start Docker and enable it on boot
sudo systemctl start docker
sudo systemctl enable docker
Step 6: Verify installation
docker --version

2. Installing Docker on macOS

Step 1: Download Docker Desktop
Step 2: Install Docker
  • Open the downloaded .dmg file.
  • Drag the Docker icon into the Applications folder.
Step 3: Start Docker
  • Launch Docker from the Applications folder.
  • Follow the on-screen instructions to complete the setup.
Step 4: Verify installation

Open a terminal and run:

docker --version

3. Installing Docker on Windows

Step 1: Download Docker Desktop
Step 2: Install Docker
  • Run the downloaded .exe file.
  • Follow the installation wizard.
  • During the installation, ensure the option Enable WSL 2 features is selected (required for Windows 10/11).
Step 3: Start Docker
  • Launch Docker Desktop from the Start Menu.
  • Sign in with your Docker Hub account or create one.
Step 4: Verify installation

Open PowerShell or Command Prompt and run:

docker --version

Post-Installation Tips

Add Your User to the Docker Group (Linux):
sudo usermod -aG docker $USER

Log out and back in to apply changes.

Test Docker Installation:

Run a test container:

docker run hello-world
Install Docker Compose (if not included):
docker compose version

Install a Frontend for the LLM

After setting up Docker and Ollama, install a frontend like Chatbox.ai or open-webui for a user-friendly chat interface.

Open-WEBUI Screenshot

Open-WEBUI Interface

Installing Ollama

Ollama is a tool for running large language models (LLMs) locally. It simplifies model management and allows running advanced AI models on your hardware.

1. Installing Ollama on macOS

Ollama currently supports macOS natively. Here's how to install it:

Install Ollama via Homebrew:
brew install ollama/tap/ollama
Start the Ollama service:
ollama serve
Verify Installation:

Run the following command to confirm:

ollama --version

2. Installing Ollama on Windows or Linux

Ollama doesn't yet natively support Windows or Linux, but you can run it on these platforms via macOS virtualization or containerization solutions like Docker. Stay updated by visiting the Ollama official site.

Downloading and Running Different DeepSeek LLMs

Once Ollama is installed, you can easily install and run models like DeepSeek.

1. Install a Model

To install a model, use the ollama run command. This will pull the model if it's not already downloaded. For example, to install and run a DeepSeek model:

ollama run deepseek-r1:8b

(Replace 8b with the desired model size)

2. List Available Models

To see all installed models:

ollama list

3. Run a Model

To use a specific installed model:

ollama run <model_name>

Example:

ollama run deepseek-r1:8b

4. Managing Models

Delete a Model: If you need to remove a model to free up space:

ollama rm <model_name>

Example:

ollama rm deepseek-r1:8b

5. Testing and Using DeepSeek LLMs

You can interact with the DeepSeek models through the terminal after running them. For example:

ollama run deepseek-r1:8b

Then, type your input query to test the model's capabilities.

DeepSeek Models Available

DeepSeek provides multiple models optimized for various tasks. Common versions include:

# 1.5B version (smallest):
ollama run deepseek-r1:1.5b

# 8B version:
ollama run deepseek-r1:8b

# 14B version:
ollama run deepseek-r1:14b

# 32B version:
ollama run deepseek-r1:32b

# 70B version (biggest/smartest):
ollama run deepseek-r1:70b

This is the command to run and install a model from Ollama:

ollama run deepseek-r1:8b

Screenshots

Screenshot 1 Screenshot 2 Screenshot 3

Conclusion

In conclusion, running DeepSeek on an 11th Gen Intel i5 laptop CPU proves to be a practical solution for lightweight AI workloads. With the 8B model, the system achieves a processing speed of 1.5–2 words per second, making it perfectly suitable for small-scale applications. While it utilizes around 80–90% of the CPU during operation, the performance is stable and reliable, demonstrating that even modest hardware can power advanced language models effectively when optimized with tools like Ollama and Docker.

Further Reading

Read this for the comparison of the Models available: https://huggingface.co/deepseek-ai/DeepSeek-V3

Learning Ansible

Week 1 - 27/12/2024


 Ansible is an open-source automation tool used for configuration management, application deployment, and task automation. It simplifies complex IT tasks by automating repetitive processes, making it easier to manage large-scale systems.

Key Features of Ansible

  • Agentless: Unlike other automation tools, Ansible does not require any agent software to be installed on the managed nodes. It uses SSH for communication, making it lightweight and easy to set up.

  • Declarative Language: Ansible uses a simple, human-readable language called YAML (Yet Another Markup Language) to define automation tasks. This makes it accessible to both developers and system administrators.

  • Idempotency: Ansible ensures that tasks are idempotent, meaning they can be run multiple times without changing the system's state if it is already in the desired state.

  • Extensible: Ansible has a modular architecture, allowing users to extend its functionality with custom modules, plugins, and roles.

Use Cases

  • Configuration Management: Ansible can manage the configuration of servers, ensuring they are set up consistently and correctly.

  • Application Deployment: Automate the deployment of applications across multiple servers, reducing the risk of human error.

  • Orchestration: Coordinate complex workflows and processes across different systems and environments.

  • Provisioning: Set up and configure new servers and infrastructure components.

Getting Started with Ansible

  1. Install Ansible: You can install Ansible using package managers like pip, apt, or yum. For example, to install Ansible using pip, run:

    bash
    pip install ansible
    
  2. Create an Inventory File: An inventory file lists the hosts and groups of hosts that Ansible will manage. Here's an example of a simple inventory file:

    ini
    [webservers]
    web1.example.com
    web2.example.com
    
    [dbservers]
    db1.example.com
    db2.example.com
    
  3. Write a Playbook: A playbook is a YAML file that defines the tasks Ansible will perform on the managed hosts. Here's an example of a basic playbook:

    yaml
    ---
    - name: Install and configure web server
      hosts: webservers
      become: yes
      tasks:
        - name: Install Apache
          apt:
            name: apache2
            state: present
    
        - name: Start Apache service
          service:
            name: apache2
            state: started
            enabled: yes
    
  4. Run the Playbook: Use the ansible-playbook command to run the playbook:

    bash
    ansible-playbook -i inventory playbook.yml
    

Benefits of Using Ansible

  • Simplicity: Ansible's straightforward syntax and agentless architecture make it easy to learn and use.

  • Scalability: Ansible can manage thousands of nodes efficiently, making it suitable for large-scale environments.

  • Flexibility: Ansible can be used for a wide range of automation tasks, from simple configuration management to complex orchestration

Why Use Ansible Rather than Jenkins 

  1. Configuration Management: Ansible excels in configuration management, automation, and orchestration, while Jenkins is primarily a CI/CD tool.

  1. Agentless Architecture: Ansible operates without the need for agents on target machines, simplifying setup and reducing overhead.

  2. Ease of Use: Ansible uses a simple, human-readable YAML syntax, making it easier to write and understand automation scripts.

  3. Idempotency: Ansible ensures tasks are idempotent, maintaining consistency in your infrastructure.

  4. Integration: Ansible integrates well with a wide range of tools and platforms, focusing on infrastructure management and automation.

  5. Declarative Approach: Ansible follows a declarative approach, defining the desired state, while Jenkins follows an imperative approach, defining the steps to be executed


    As I use Jenkins for Work, it was a refreshing to learn Ansible for Deployments.


Week 2 - 27/12/2024


Learning NodeJS and moving into DENO


What is

  • Runtime Environment: is built on Chrome's V8 JavaScript engine, enabling you to run JavaScript code outside of a web browser.

  • Event-Driven: It uses an event-driven, non-blocking I/O model, making it efficient and suitable for real-time applications.

  • Single-Threaded: Despite being single-threaded, can handle many connections simultaneously thanks to its asynchronous nature.

Key Features

  • NPM (Node Package Manager): A vast library of open-source packages that you can use to extend the functionality of your applications.

  • Asynchronous Programming: uses callbacks, promises, and async/await to handle asynchronous operations.

  • Modules: has a module system that allows you to organize your code into reusable components.

Use Cases

  • Web Servers: is commonly used to build web servers and APIs.

  • Real-Time Applications: Ideal for applications that require real-time communication, such as chat apps and online gaming.

  • Microservices: is well-suited for building microservices due to its lightweight and modular nature.

Getting Started

  1. Install : Download and install from the .

  2. Create a Project: Initialize a new project using npm init and create a package.json file.

  3. Write Your First Script: Create a simple JavaScript file, such as app.js, and write your first code.

Example Code

Here's a simple example of a server:

javascript
const http = require('http');

const server = http.createServer((req, res) => {
    res.statusCode = 200;
    res.setHeader('Content-Type', 'text/plain');
    res.end('Hello, World!\n');
});

const port = 3000;
server.listen(port, () => {
    console.log(`Server running at http://localhost:${port}/`);
});

This code creates a basic HTTP server that listens on port 3000 and responds with "Hello, World!" when accessed


Using Deno for a NodeJS replacement,

Deno is a modern runtime for JavaScript and TypeScript, created by Ryan Dahl, the original developer of It was designed to address some of the shortcomings of and to provide a more secure and efficient environment for running JavaScript and TypeScript code. Here are some advantages of Deno over Node.js:

  1. Security: Deno has a secure-by-default approach. It runs code in a sandboxed environment and requires explicit permissions for file system access, network access, and environment variables. This reduces the risk of security vulnerabilities.

  2. TypeScript Support: Deno has built-in support for TypeScript, allowing you to write and run TypeScript code without the need for additional tools or configuration. This makes it easier to work with TypeScript out of the box.

  3. Simplified Dependency Management: Deno uses URL-based imports for dependencies, eliminating the need for a separate package manager like npm. This simplifies dependency management and reduces the risk of dependency-related issues.

  4. Standard Library: Deno comes with a standard library that is audited and maintained by the Deno team. This ensures a consistent and reliable set of APIs for common tasks, reducing the need for third-party libraries.

  5. Modern Features: Deno leverages modern JavaScript features and web standards, making it more aligned with current web development practices. It also includes built-in development tooling, such as a linter, formatter, and test runner.

  6. Single Executable: Deno is distributed as a single executable file, making it easy to install and use without the need for additional setup or configuration.

While Deno offers several advantages, it's important to consider your specific use case and requirements when choosing between Deno and has a mature ecosystem, extensive community support, and a vast library of packages, which can be beneficial for many projects.


Getting Deno Working

Getting Started with Deno

  1. Installation:

    • Windows: Use the PowerShell command:

      sh
      iwr https://deno.land/x/install/install.ps1 -useb | iex
      
    • macOS/Linux: Use the shell command:

      sh
      curl -fsSL https://deno.land/x/install/install.sh | sh
      
  2. Running a Script:

    • Create a simple TypeScript file, hello.ts:

      ts
      console.log("Hello, Deno!");
      
    • Run the script using Deno:

      sh
      deno run hello.ts
      
  3. Permissions:

    • Deno is secure by default. To allow network access, use the --allow-net flag:

      sh
      deno run --allow-net server.ts
      
  4. Importing Modules:

    • Deno uses URL-based imports. For example:

      ts
      import { serve } from "https://deno.land/std@0.95.0/http/server.ts";
      
  5. Standard Library:

    • Deno comes with a standard library that you can use without additional dependencies. Check out the for more information.

  6. Development Tools:

    • Deno includes built-in tools like a linter, formatter, and test runner. You can use them as follows:

      sh
      deno lint
      deno fmt
      deno test
      

Deno offers a secure, modern, and efficient environment for JavaScript and TypeScript development.